A quick and convenient way to convert cryptocurrency prices to fiat currencies or to BTC or ETH is through Chrome extensions. In this article, we'll cover how to build a simple yet functional cryptocurrency converter Chrome extension in 8 steps:
- Setting up the development environment
- Creating the extension files
- Building the user interface
- Fetching crypto prices
- Converting prices
- Testing the extension
- Packaging the extension
- Publishing the extension to the Chrome Web Store (optional)
By the end of this tutorial, you will have a working Chrome extension that fetches real-time crypto prices from the CoinGecko API and converts them to various fiat currencies. The extension will support multiple cryptocurrencies and fiat currencies, making it a versatile tool for crypto enthusiasts.

Prerequisites
To follow along, be sure to have the following installed:
- CoinGecko API: We will be using the CoinGecko API (Demo plan) to fetch the market chart data for cryptocurrencies. The free Demo plan is accessible to all users with a 30 calls/min rate limit and a monthly cap of 10,000 calls.
- Text Editor or IDE: You will need a text editor or an Integrated Development Environment (IDE) to write your code. Some popular choices include Sublime Text, Atom, Visual Studio Code, and PyCharm. I will be using Visual Studio Code as the IDE, which is a smart, fast and customizable IDE available in the market.
- Google Chrome: Ensure you have the latest version of Google Chrome installed, as we may need it for testing and development purposes. You can download and install it from here Chrome. If you already have Chrome installed, make sure it is up to date. You can update it by going to Settings > About Chrome and following the instructions to update to the latest version.
Understanding Chrome Extensions
Before diving into the development, it's essential to understand what Chrome extensions are and how they work.
Chrome extensions are small software programs that customize the browsing experience. They enable users to tailor Chrome functionality and behavior to individual needs or preferences. Extensions are built using web technologies such as HTML, CSS, and JavaScript. They have access to various APIs that allow them to interact with the browser and the web page content.
Step 1: Setting Up the Development Environment
First, create a new directory for your extension. Open your terminal or command prompt and run the following command to create a new directory:
mkdir crypto-price-converter-extension
cd crypto-price-converter-extension
Organize your development environment by creating a workspace where all related files and assets will be stored. This will make it easier to manage and locate files as the project grows.
Step 2: Creating the Extension Files
Inside the newly created directory, create the following files:
- manifest.json
- popup.html
- popup.js
- styles.css
- extension.png
crypto-price-converter/
└─── src/
│
├── manifest.json
├── popup.html
├── popup.js
├── styles.css
└── extension.png
These files will define the extension's manifest, user interface, functionality, and styling, respectively. Let's discuss each of these files in detail.
manifest.json
The manifest file is essential for any Chrome extension. It provides the necessary information about the extension, such as its name, version, description, and permissions. Create a `manifest.json` file with the following content
{
"manifest_version": 3,
"name": "Crypto Price Converter",
"version": "1.0",
"description": "Convert crypto prices to different currencies.",
"action": {
"default_popup": "popup.html",
"default_icon": {
"16": "extension.png",
"48": "extension.png",
"128": "extension.png"
}
},
"icons": {
"128": "extension.png"
},
"permissions": [
"activeTab"
],
"host_permissions": [
"https://api.coingecko.com/"
]
}
This manifest defines the extension's basic properties and permissions. The `default_popup` specifies the HTML file to be used as the extension's popup interface, and `default_icon` defines the icons used at various resolutions.
Detailed Explanation of Manifest Fields
- manifest_version: This specifies the version of the manifest file format. Chrome currently supports manifest version 3, which offers better security and performance improvements over previous versions.
- name: This is the name of your extension, which will be displayed in the Chrome Web Store and the Extensions page.
- version: The version of your extension, following semantic versioning (e.g., 1.0, 1.1).
- description: A brief description of what your extension does.
- action: This section defines the default properties for the browser action (popup), including the HTML file and icons.
- permissions: Permissions required by your extension, such as accessing the active tab.
- host_permission: Permissions to access specific hosts or URLs, in this case, the CoinGecko API.
popup.html
The `popup.html` file defines the user interface of the extension. Create a `popup.html` file with the following content:
<!DOCTYPE html>
<html>
<head>
<title>Crypto Price Converter</title>
<link rel="stylesheet" type="text/css" href="styles.css">
</head>
<body>
<div id="converter">
<h1>Crypto Price Converter</h1>
<div>
<label for="crypto">Cryptocurrency:</label>
<select id="crypto">
<option value="bitcoin">Bitcoin</option>
<option value="ethereum">Ethereum</option>
<option value="litecoin">Litecoin</option>
<option value="ripple">Ripple</option>
<option value="cardano">Cardano</option>
<option value="polkadot">Polkadot</option>
<option value="dogecoin">Dogecoin</option>
</select>
</div>
<div>
<label for="fiat">Fiat Currency:</label>
<select id="fiat">
<option value="usd">USD</option>
<option value="eur">EUR</option>
<option value="gbp">GBP</option>
<option value="inr">INR</option>
</select>
</div>
<div>
<button id="convert">Convert</button>
</div>
<div id="result"></div>
</div>
</body>
</html>
This HTML file creates a simple form with dropdowns for selecting a cryptocurrency and a fiat currency, and a button to perform the conversion. The `div` with `id="result"` is used to display the conversion result.
Styles.css
The `styles.css` file defines the styling for the extension's popup. Create a `styles.css` file with the following content:
body {
font-family: Arial, sans-serif;
width: 300px;
padding: 20px;
}
#converter {
text-align: center;
}
label {
display: block;
margin-top: 10px;
}
button {
margin-top: 10px;
}
#result {
margin-top: 20px;
font-weight: bold;
}
This CSS file provides basic styling to make the UI look clean and organized. It ensures that the text is centered, adds spacing between elements, and styles the button and result text.
popup.js
The `popup.js` file contains the JavaScript code that handles the conversion logic. Create a `popup.js` file with the following content:
document.getElementById('convert').addEventListener('click', function() {
const crypto = document.getElementById('crypto').value;
const fiat = document.getElementById('fiat').value;
const url = `https://api.coingecko.com/api/v3/simple/price?ids=${crypto}&vs_currencies=${fiat}`;
const options = {
method: 'GET',
headers: {
accept: 'application/json',
'x-cg-pro-api-key': 'YOUR_API_KEY'
}
};
fetch(url,options)
.then(response => response.json())
.then(data => {
const price = data[crypto][fiat];
document.getElementById('result').innerText = `1 ${crypto} = ${price} ${fiat.toUpperCase()}`;
})
.catch(error => {
console.error('Error fetching data:', error);
document.getElementById('result').innerText = 'Error fetching data. Please try again.';
});
});
This JavaScript file adds an event listener to the "Convert" button. When the button is clicked, it fetches the conversion rate from the CoinGecko API and updates the UI with the result
extension.png
`extension.png` is the icon for your Chrome extension. This image will be displayed in the Chrome toolbar and in the Chrome Web Store. You can create or download a suitable icon image and place it in the src directory. Ensure the icon is a square image and in PNG format, with recommended sizes being 16x16, 48x48, and 128x128 pixels.
Step 3: Building the User Interface
The user interface (UI) of the extension consists of a simple HTML form where users can select a cryptocurrency and a fiat currency, and then click a button to get the conversion rate. The `popup.html` file you created earlier defines this UI. The `styles.css` file provides basic styling to make the UI look clean and organized.
Step 4: Fetching Crypto Prices
The `popup.js` file contains the logic to fetch crypto prices from the CoinGecko API. When the user clicks the 'Convert' button, the script constructs the API URL based on the selected cryptocurrency and fiat currency, and then makes a fetch request to the CoinGecko API.
The fetch request retrieves the conversion rate, and the script updates the UI with the result. If there is an error (e.g., network issue or invalid response), the script displays an error message.
Fetching data from external APIs is a common task in web development. Understanding how to handle asynchronous operations, such as API requests, is crucial. In this example, we use the Fetch API, which is a modern and flexible way to make HTTP requests
Step 5: Converting Prices
The conversion logic is simple: it fetches the price of the selected cryptocurrency in the selected fiat currency and displays it to the user. The CoinGecko API provides this data in a straightforward JSON format, which makes it easy to parse and use in our extension.
Here's a breakdown of the process:
- The user selects a cryptocurrency and a fiat currency.
- The user clicks the "Convert" button.
- The JavaScript code constructs the appropriate API URL.
- The Fetch API is used to make a GET request to the CoinGecko API.
- The response is parsed as JSON.
- The conversion rate is extracted from the JSON data.
- The result is displayed to the user.
Step 6: Testing the Extension
To test the extension:
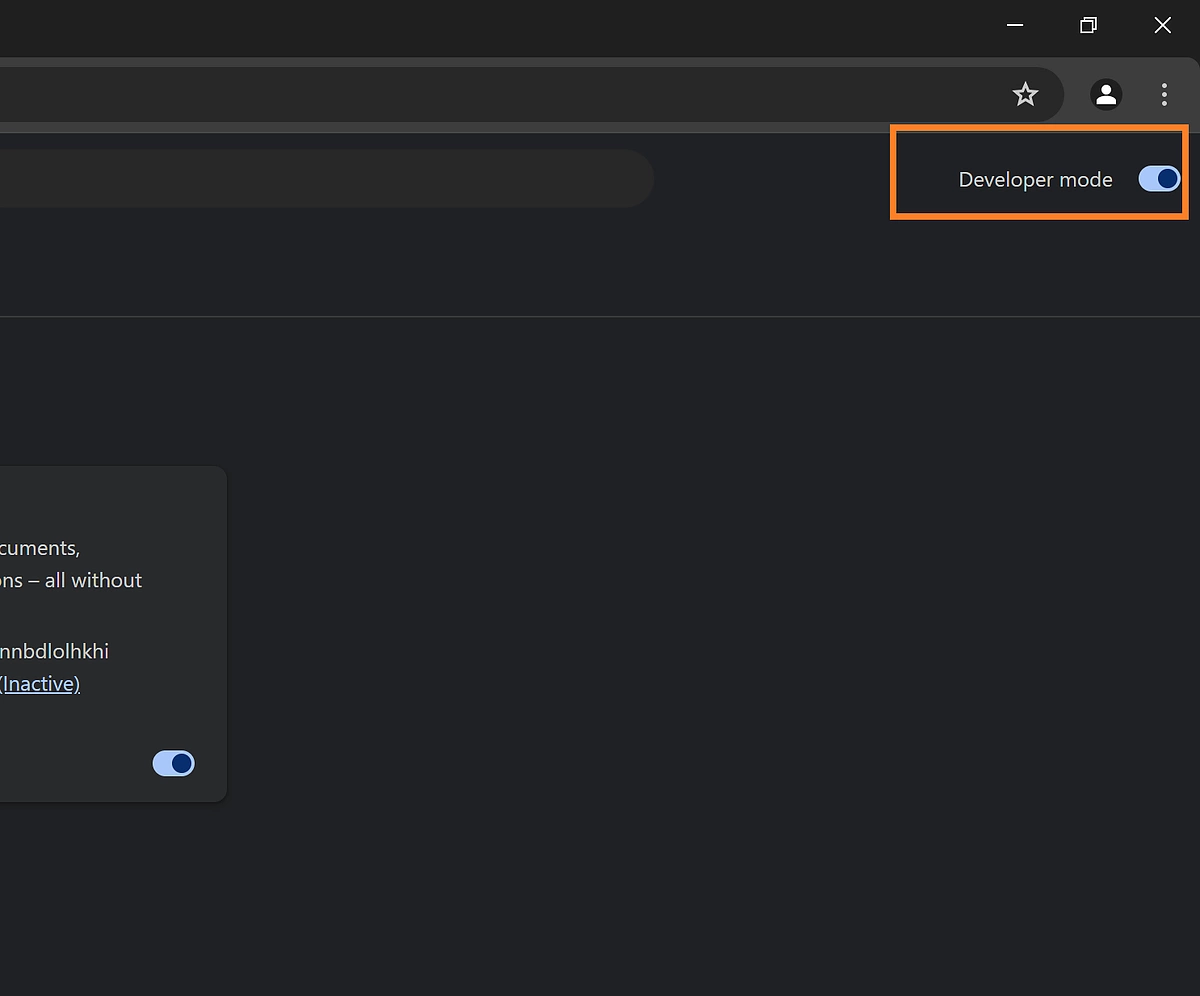
- Open Google Chrome and go to `chrome://extensions/.`
- Enable "Developer mode" by clicking the toggle switch in the top right corner.
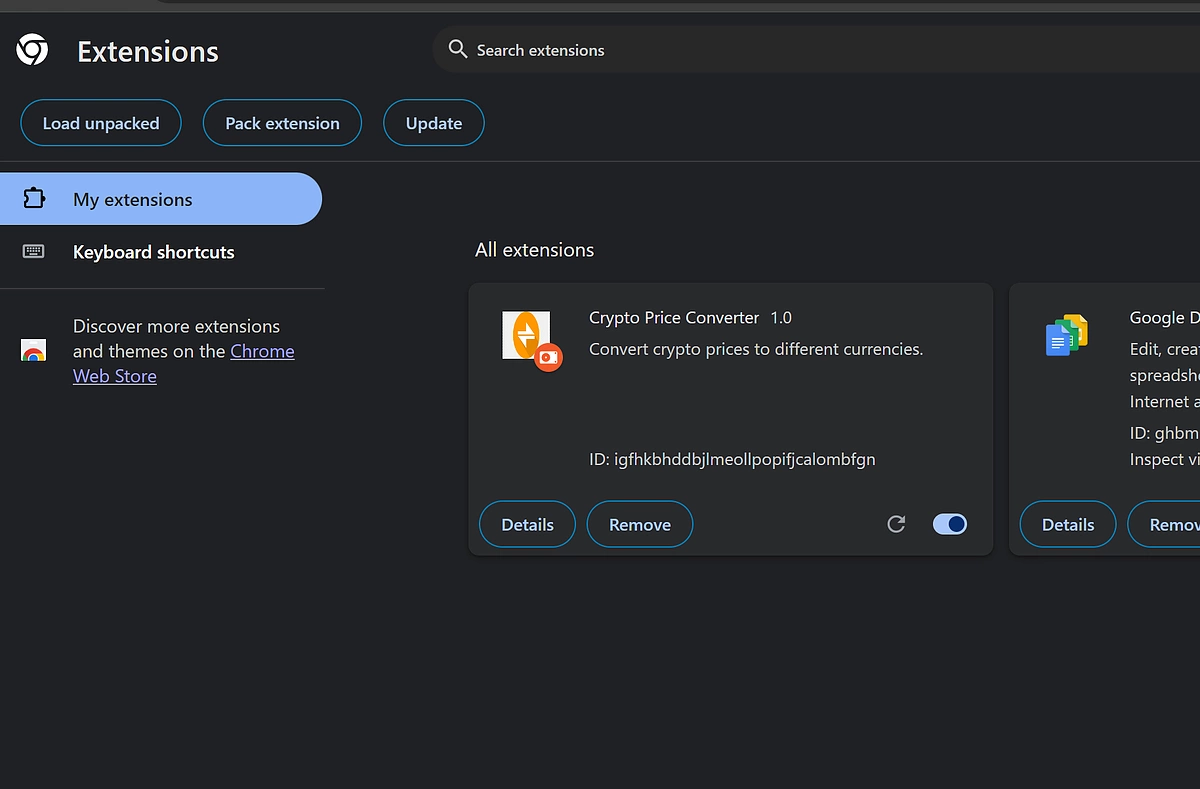
- Click "Load unpacked" and select your extension's directory.
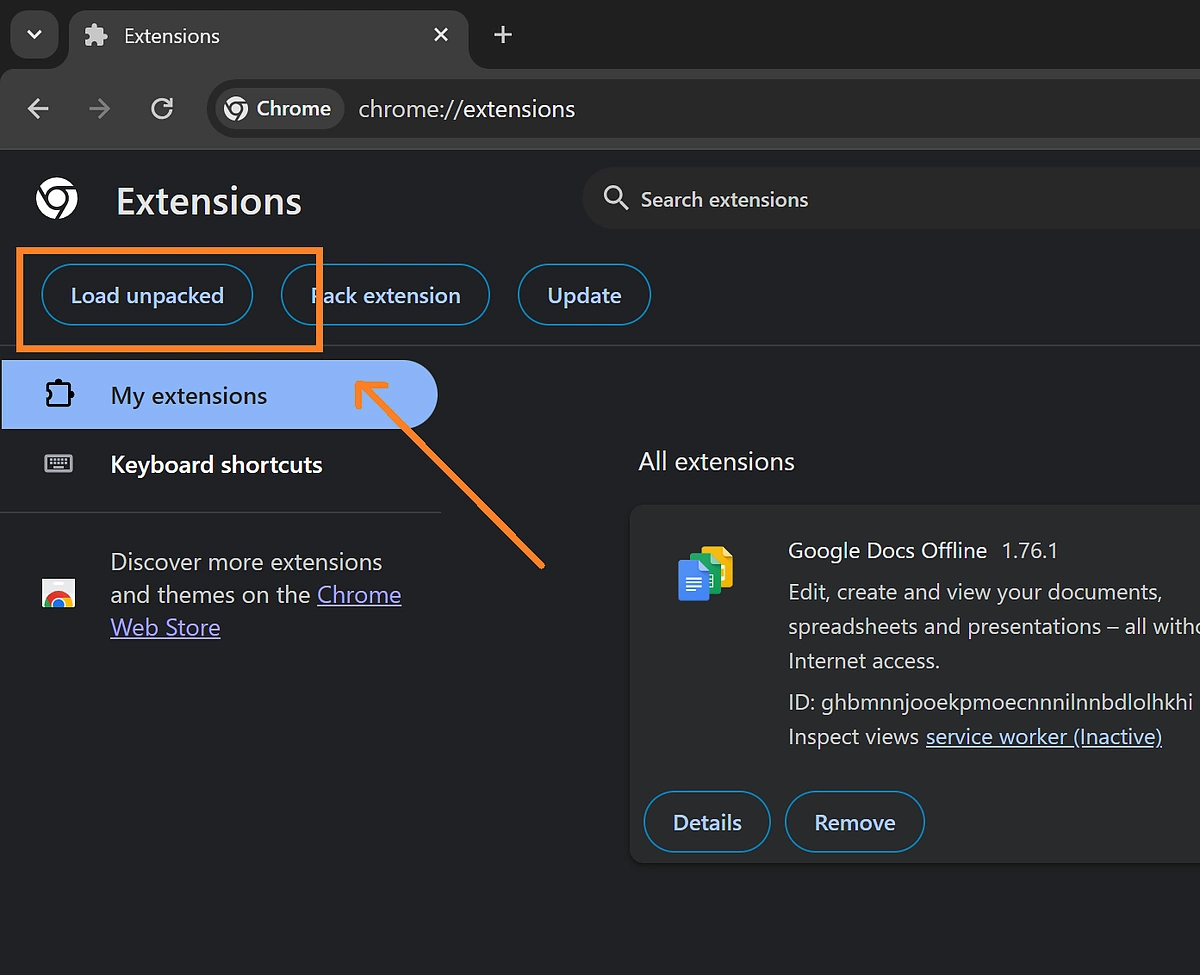
- Your extension should now be loaded, and an icon should appear.
- Click the extension icon to open the popup and use the converter.
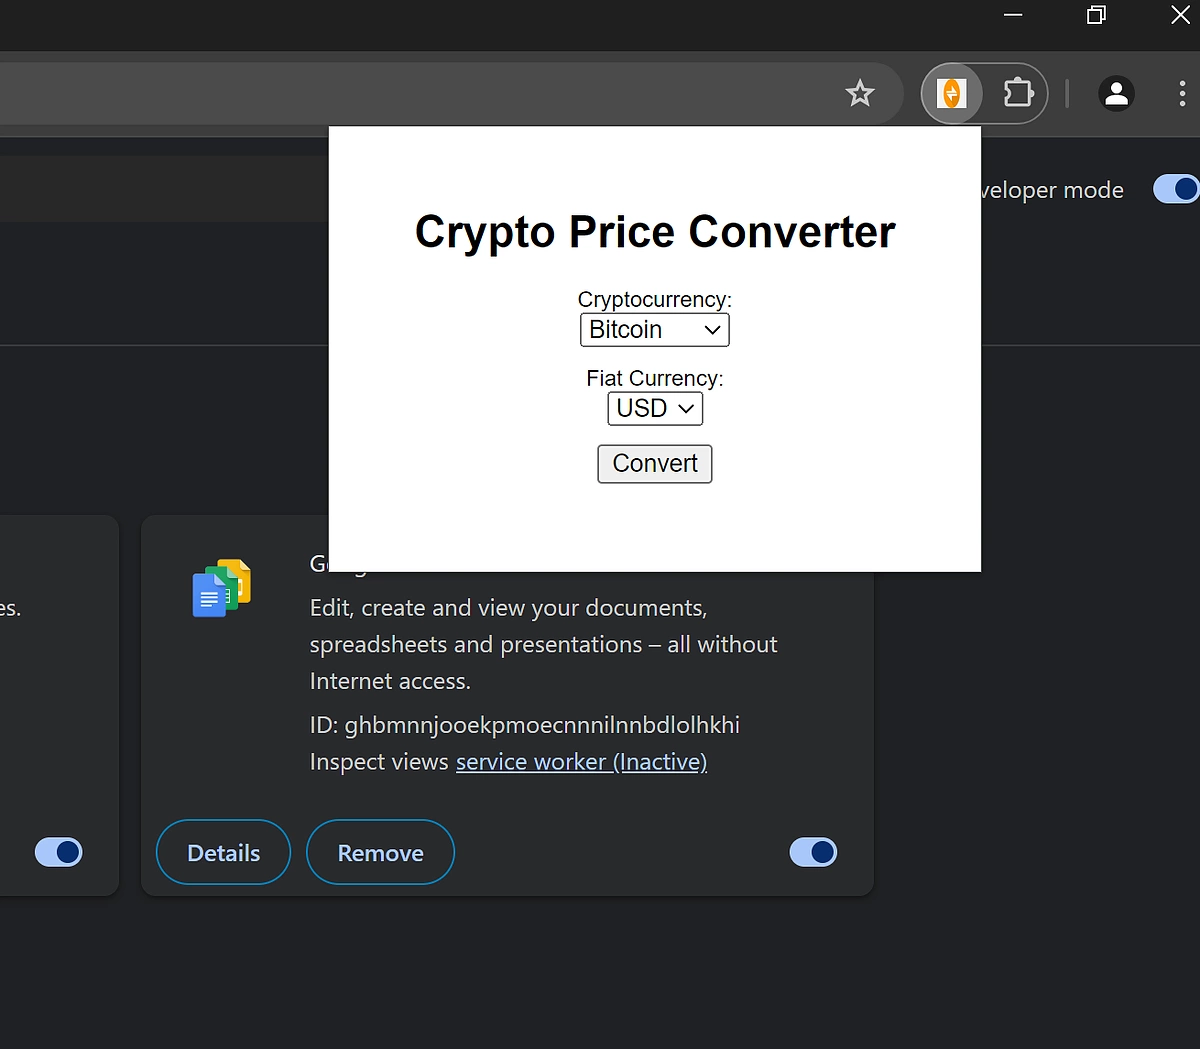
Make sure to test various combinations of cryptocurrencies and fiat currencies to ensure everything works as expected.
Testing is a critical part of the development process. It ensures that your extension works correctly under various conditions. In addition to functional testing, consider performing usability testing to ensure that the extension is easy to use and understand.
Step 7: Packaging the Extension
Once you are satisfied with your extension, you can package it for distribution:
- Go to `chrome://extensions/`.
- Click 'Pack extension'.
- Select your extension's directory and follow the prompts.
- This will generate a `.crx` file that you can distribute or upload to the Chrome Web Store.
Packaging your extension is an important step before distribution. It involves bundling all the necessary files into a single package that can be easily installed by users. The `.crx` file format is used by Chrome extensions for this purpose.
Step 8: Publishing the Extension to the Chrome Web Store (Optional)
To share your extension with a wider audience, you can publish it to the Chrome Web Store. Follow these steps:
- Create a developer account on the Chrome Web Store.
- Pay the one-time registration fee.
- Submit your packaged extension (.crx file) along with screenshots and a description.
- Wait for the review process to complete.
For detailed instructions, refer to the official Chrome Extension Publish documentation and the official Chrome Web Store documentation.
Publishing your extension to the Chrome Web Store makes it accessible to millions of users worldwide. It involves creating a developer account, paying a one-time registration fee, and submitting your extension for review. The review process ensures that your extension meets Chrome's security and quality standards.
Advanced Functionalities and Useful Endpoints
While this guide covers a cryptocurrency converter Chrome extension, developers who might want to cover other functionalities can consider the following:
Crypto Price Tracker extension to fetch real-time prices of cryptocurrencies and display them in the browser toolbar or a popup. Users can add their favourite coins and track their prices in multiple fiat currencies.
- Relevant endpoints: /simple/price, /coins/markets
Trending Coins Screener extension to display the top trending cryptocurrencies based on recent searches on CoinGecko. It can help users stay updated with the latest trends and popular coins in the crypto space.
- Relevant endpoint: /search/trending
Crypto Market Overview extension to display a comprehensive overview of the global cryptocurrency market, including total market capitalization, trading volume, and market dominance of major cryptocurrencies.
- Relevant endpoint: /global
Each of these extensions can leverage various CoinGecko API endpoints to fetch the required data and provide users with valuable information and tools related to cryptocurrencies. The endpoints mentioned are just examples, and additional endpoints can be used to enhance the functionality of these extensions further.

Real-World Applications
A crypto price converter can be used in various real-world scenarios:
- Trading: Traders need to convert between different currencies to execute trades efficiently and quickly. A converter provides them with instant access to the latest rates.
- Investment Tracking: Investors can keep track of their portfolio's value in their preferred fiat currency, helping them monitor performance and make strategic decisions.
- E-commerce: Businesses that accept cryptocurrencies can use a converter to display prices in multiple fiat currencies, catering to a global customer base.
- Education: Educators and students in finance and economics can use a converter as a practical tool to understand the dynamics of cryptocurrency markets.
Conclusion
Building a cryptocurrency converter Chrome extension is a great way to learn about Chrome extensions, web APIs, and JavaScript. This tutorial has covered the entire process, from setting up your development environment to publishing the extension on the Chrome Web Store.
But the learning doesn’t stop here! The extension is designed to be customisable, allowing you to add more features as you grow more comfortable with coding and alongside the evolving crypto landscape. Whether it’s integrating new cryptocurrency APIs or adding support for new cryptocurrencies, the possibilities for expansion are virtually limitless. Happy coding!
Interested in similar guides like this one? Check out this tutorial covering how to build an interactive crypto price tracker with React JS.

Subscribe to the CoinGecko Daily Newsletter!


 Or check it out in the app stores